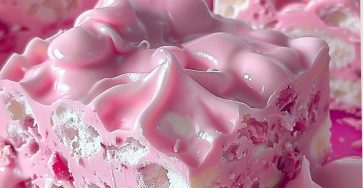
Bubblegum Cloud Fudge — Dreamy, Creamy, Melt-in-Your-Mouth Magic
If you’re looking for a fun, whimsical, and super creamy no-bake treat, this Bubblegum Cloud Fudge is the perfect recipe. It’s soft, smooth, melts in your mouth, and tastes just like bubblegum candy from childhood. The pastel colors and cloud-swirl design make it ideal for parties, birthdays, holidays, or just satisfying a sweet craving.
Everything comes together in a single pot, and the fridge does the rest. Easy, magical, and impossibly delicious!
Ingredients
🔹 For the Fudge:
- 21 ¼ ounces white chocolate (about 600g), chopped
- ¾ cup sweetened condensed milk
- 2 tablespoons butter
- 1 teaspoon bubblegum extract
- A few drops of pink or blue food coloring (optional)
- A pinch of salt (to balance the sweetness)
🔹 Optional Toppings:
- Sprinkles
- Mini marshmallows
- Edible glitter
- White chocolate drizzle
Step-by-Step Instructions
1. Prep Your Pan
Line an 8×8 inch (20×20 cm) square pan with parchment paper.
Leave some overhang on the sides — this will help you lift the fudge out once it’s set.
Lightly grease the parchment with a bit of butter or non-stick spray.
2. Melt the Base
In a medium heavy-bottom saucepan over low heat:
- Add the white chocolate
- Pour in the sweetened condensed milk
- Add the butter
Stir constantly with a rubber spatula.
White chocolate burns very easily, so keep the heat low and slow.
When everything is melted and silky smooth, remove from heat.
3. Add Flavor and Color
While the mixture is still hot:
- Stir in bubblegum extract (start with 1 teaspoon; you can add more if you want a stronger flavor).
- Add a pinch of salt.
- Add a few drops of pink or blue food coloring and mix until you get your desired shade.
Tip:
If you want a cloud-swirl effect, divide the mixture into 2 bowls and color each one differently (pink + blue, pink + white, etc.).
4. Create the Cloud Swirl Effect
Pour the fudge into the prepared pan:
- If using 1 color: simply pour and smooth the top.
- If using 2 colors: spoon dollops of each color randomly in the pan.
- Drag a toothpick or skewer through the fudge in swirling motions to create a magical “cloud marble” look.
This step makes the fudge look like cotton candy clouds!
5. Add Toppings (Optional)
While the fudge is still warm on top, add:
- Sprinkles
- Mini marshmallows
- Edible glitter
- Extra colored chocolate drizzle
This makes the fudge look fun, festive, and candy-shop perfect.
6. Chill Until Set
Place the pan in the refrigerator for 3–4 hours, or until completely firm.
For quicker results, you can place it in the freezer for 1½–2 hours.
7. Cut and Serve
Once set, lift the fudge out using the parchment overhang.
Use a sharp knife (run it under hot water and dry it for clean cuts) and slice into small squares.
The texture should be smooth, creamy, and slightly chewy with that iconic bubblegum flavor.
Serving Ideas
- Perfect for birthday party dessert tables
- Great for candy-themed events
- Cute gift boxes for friends
- Cut into shapes using cookie cutters (hearts, stars, rainbows)
Tips for Perfect Fudge
- Use high-quality white chocolate for the smoothest texture.
- Don’t let the mixture boil; it should only melt gently.
- Bubblegum extract is strong — a little goes a long way.
- If the mixture is too thick, add 1 tablespoon of condensed milk.
Timing
- Prep Time: 10 minutes
- Chill Time: 3–4 hours
- Total: About 3 hours and 20 minutes